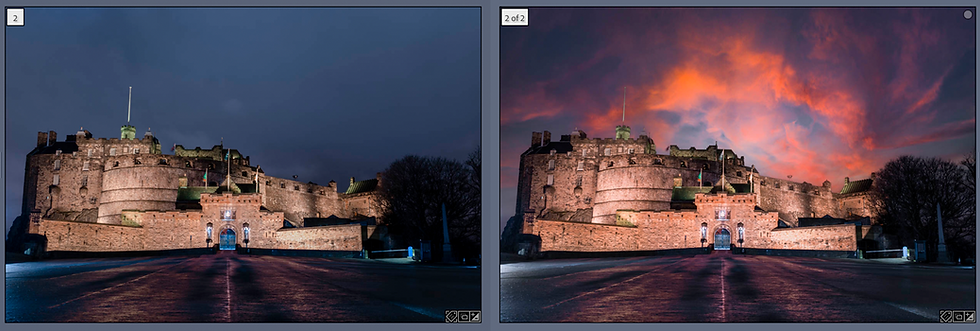
Hi there! This is my first tutorial in my new “How To” section. In time, this will include guides for all kinds of things, such as using ND filters, how to load a roll of film in a camera, editing technique (such as this), and so on!
So with that said, here’s my first How To guide: How To: Replace a Sky in Photoshop!
Step 1: Find a Suitable Image
First things first, you’ll need to identify a decent photo to put a fake sky into. In this instance, I’m going to use an old photo of Edinburgh Castle taken late at night. It was a 4 second exposure, so that effectively removed the few people who were wandering around.

The night was a big gloomy, the drizzle was coming down a bit, but that gave the lovely reflection on the esplanade - more about how this will be useful later on!
Step 2: Load the photo in Photoshop
Now you’ve identified your photograph, next you need to load it into photoshop.
I use Lightroom for all my cataloguing needs. It’s really handy as you can keyword, rate, flag images etc before processing them. However, another really nifty tool is the Edit In option of the right-click menu, which allows you to load it into Photoshop directly. Handy!

Step 3: Sky Replacement
In Photoshop, head up to the Edit menu, and simply choose the “Sky Replacement” option. There are a couple pre-loaded options to get you started. In this instance, I’m using the Spectacular004byRussellBrown option, conveniently stored in the “Spectacular” part.

You can see that the background then previews onto the image, and as you adjust the option those changes are reflected live onto the image as well.
A menu will also appear under where you select your replacement sky.
Most of these are pretty self explanatory, and it’s good to experiment in any case so |’ll not go into too much detail here. Rather, the important ones (I find) are the sky and foreground adjustments.

Sky Adjustments consist of brightness, that adjusts how brightly the replacement sky will be over the image, the temperature of the image - from cool to warm, and scale. For this image, I’m justo going to leave the sliders in place at 0 for both, and I’ll leave the scale.
Scale adjusts the size of the replacement sky, so if you want to emphasise a particular cloud in it. Again, I like this as it is so I’m going leave it at 100.
Foreground Adjustments consist of Lighting Mode, Lighting Adjustment and Color Adjustment. I usually leave Lighting Mode to the default, Multiply. Since I prep my images in Lightroom before importing them into Photoshop, I’m already happy with the highlights and shadows, so Lighting Adjustment gets left where it goes. In this case, a value of 37.
Color is the one I regularly change, however. This impacts the colour temperature of the foreground image, the one you imported. I like to put this all the way to the right in most instances, as it shifts the colour temp to match the sky a bit more. As with all post processing of course, this is purely a subjective point of view and you might want to choose different settings.
All this takes longer to read than to do, so it’s actually a quick process - which is good, since not all images you might think would work well actually do but with a bit of experience you’ll soon be able to tell.
Step 4: Save
Save the file once you’ve completed this step, and unless you intend on further adjustments in Photoshop itself you can either export it from here, or switch back to Lightroom.
To save quickly, press ctrl+s on a windows machine, or cmd+s on a Mac.
The beauty of loading the image from Lightroom to Photoshop is that once you save the file, the edited TIFF file automatically appears in Lightroom alongside the original, which makes further tweaks possible.

Step 5: Optional Final Tweaks
Now the image is back in Lightroom, I just want to remove some of the blue light on the esplanade. This is really easy to do, and it’s really quick. Simply head to the Develop module, scroll the right hand toolbar down until you find the HSL section, and choose the round adjustment scrubber, then simply move over the colour you want to adjust the saturation of and click and drag the mouse up or down accordingly. Moving the mouse down desaturates, and moving the mouse up increases saturation.

Now the image is sorted, it’s time to export and do with as you like!

Have you done any sky replacements in photoshop? I’d love to see them! Place a link in the comments and I’ll take a look!
How did you find this How To Guide? Again, let me know in the comments!
All the best,
Olly

コメント